Table of Contents
Section I. Introduction
HubSpot is undoubtedly a great platform for marketing and sales teams, with its great CRM and other tools. But HubSpot’s CMS for building websites is very limited when it comes to freedom of customizable and data ownership.
There are better alternatives to HubSpot’s CMS to build beautiful and feature-rich websites. WordPress is one such alternative that offers a cost-effective solution with extensive design options and complete data ownership.
This article is a detailed step-by-step guide to migrate from HubSpot to WordPress, we will dive into each step’s technicalities and maximizing your website’s potential.
HubSpot vs WordPress: A Quick Breakdown
HubSpot is an all-in-one platform with website hosting, marketing tools, and a user-friendly interface. However, its pricing can become expensive, and functionality & design customization is limited.
On the other hand, WordPress, a free and open-source content management system, focuses on website creation and management.
WordPress boasts a vast directory of themes and plugins for unmatched design flexibility and functionality. This allows you to create a website that is highly dynamic and unique.
While you’ll need to pay for website hosting and potentially some premium themes or plugins, the overall cost is significantly lower compared to HubSpot’s tiered pricing structure, and you retain complete control of your website data.
Understanding HubSpot vs. WordPress Differences
Here’s what makes WordPress a compelling choice compared to HubSpot:
- Cost-Effectiveness: Free software with lower overall running costs compared to tiered HubSpot plans.
- Customization: Unmatched level of customization through themes and plugins, allowing for unique and personalized websites.
- Flexibility: Integrates with various marketing and sales tools, offering more choice and avoiding vendor lock-in.
- Scalability: Manual scaling allows for cost-effective upgrades based on website traffic and needs.
- Community & Support: A large and active community around the globe provides a wealth of free resources and support options.
- Ownership: You have complete control and ownership of your website data.

Here’s a summarized table for key differences between HubSpot and WordPress for a better understanding.
| Feature | HubSpot | WordPress |
| Focus | All-in-one platform (content + marketing + sales) | Website creation & management (freedom & flexibility) |
| Pricing | Tiered pricing can get expensive for growing sites | Free, open-source software (ultra cost-effective) |
| Ease of Use | User-friendly, good for beginners | Relatively user-friendly and powerful for those who want to learn |
| Customization | Limited design options | Highly customizable (themes & plugins) |
| Scalability | You can upgrade to higher tiers | Flexible & cost-effective options |
| SEO | Built-in tools, but provides less control to users | Requires SEO plugins (greater control & optimization) |
| Community & Support | Dedicated team support (paid plans) | Large, active community (free & paid support options) |
| Marketing & Sales | Built-in tools (requires separate subscriptions for advanced features) | Integrations with various marketing & sales tools (more flexibility & choice) |
| Control & Ownership | Data resides on HubSpot servers | Complete control & ownership of website & data |
Addressing Your Concerns
Migrating from HubSpot to WordPress might seem complex, but don’t worry! This guide will address common concerns and provide solutions:
- Difficulty: The process can be smooth with proper planning and clear instructions (provided in this guide).
- Data Loss: We’ll emphasize the importance of backing up and exporting your content from HubSpot before migration.
- SEO Impact: Learn how to implement redirects and maintain SEO best practices to minimize impact on search engine ranking.
Your Migration Journey
This guide will break down the migration process into clear steps:
- Pre-Migration Preparation: We’ll cover essential planning, content backup strategies, and optional WordPress setup (where needed).
- Migration Process: Learn to migrate blog posts, pages, forms, and images with clear instructions.
- Redirects & SEO Maintenance: Discover how to implement redirects and maintain strong SEO practices for a smooth transition.
- Post-Migration Tasks: Learn about critical post-migration tasks like testing, security, analytics integration, and WordPress content management.
Use this guide as your roadmap to migrate your website content from HubSpot to WordPress and unleash its full potential.
Section II. Pre-Migration Preparation
This section delves into the important steps for preparing before migrating your HubSpot website and blog to WordPress.

Here, we’ll guide you through:
Planning and Inventory
- Define Migration Goals:
- Do you want to migrate the entire website or specific content types (e.g., blog posts, website pages and landing pages)?
- Are there any functionalities from HubSpot you need to replicate in WordPress?
- Inventory Your Content:
- Create a comprehensive list of all content on your HubSpot site:
- Website Pages
- Landing Pages
- Blog Posts
- Forms (Comments, Form data, etc.)
- Images
- Other downloadable files (e.g., PDFs, brochures)
- Create a comprehensive list of all content on your HubSpot site:
- Analyze Website Traffic and Performance:
- Analyze website traffic data from HubSpot “Reporting & Data”. This will help you choose a suitable WordPress hosting provider with enough bandwidth and storage capacity for your website’s needs.
- Consider factors like page load speed and user experience when chosing a hosting provider.
- Choosing the Right WordPress Theme:
- Research for WordPress theme that is similar to your existing website in HubSpot or can be customized and consider features the theme offers:
- Customization options to personalize the design
- The theme is responsive
- Good user reviews and active developer support
- A lightweight and well-coded theme for better performance
- Consider theme reviews, ratings, and compatibility with your chosen WordPress environment.
- Research for WordPress theme that is similar to your existing website in HubSpot or can be customized and consider features the theme offers:
- Identify Essential Plugins:
- Research WordPress plugins that can replicate functionalities you currently use in HubSpot, such as:
- SEO plugins for search engine optimization
- Contact form plugins for creating and managing forms
- E-commerce plugins for setting up an online store (if applicable)
- Security plugins to protect your website from vulnerabilities
- Email marketing plugins to create anad manage email campaigns
- Consider plugin reviews, ratings, support, development status, and compatibility with your chosen WordPress theme.
- Research WordPress plugins that can replicate functionalities you currently use in HubSpot, such as:
By completing these pre-migration preparation steps, you’ll be well-equipped to migrate from HubSpot to WordPress successfully.
Section III. Migration Process
Here’s where the action starts! This section details the core steps of migrating your content from HubSpot to WordPress.
A. Setting Up Your WordPress Website
The beauty of WordPress is that you can freely choose your hosting, tools, and design the way you want your website to look and add functionality whenever you need it.
Two significant components exist for running an online business on a WordPress website.
- Get a Domain Name
- Choose your WordPress hosting provider
Let’s explore both of them below.
- Get a Domain Name (Optional)
Your domain name is your website’s unique address on the internet, just like your home address in the real world.
Choose a memorable domain name that reflects your brand or website purpose.- Tips: Keep it short, easy to spell and remember, and relevant to your business and website’s content.
- Registration: Numerous domain registrars offer domain name registration at competitive prices.
- Popular choices include Cloudflare, Namecheap, and GoDaddy.
Note: If you already have a domain name, you’ll need to update your Domain Name System (DNS) records, specifically the nameservers, to point them towards your WordPress hosting provider. This redirects your domain from your old HubSpot website to your newly installed WordPress site, ensuring visitors reach the correct location.
- Choose a WordPress Hosting Provider
Think of your website as a house – you need land (hosting) to build it on!
A WordPress hosting provider offers the storage space and resources needed for your website to function smoothly.
You will come across various WordPress hosting options such as “shared hosting” and “managed WordPress hosting”.- Shared Hosting (Budget-Friendly): A cost-effective option for beginners, sharing server resources with other websites.
- Managed WordPress Hosting (Hassle-Free): Optimized specifically for WordPress, often includes automatic updates, security measures, and performance enhancements. You’ll pay slightly more for this convenience.
Popular WordPress Hosting Providers:
- SiteGround (Shared)
- Hostinger (Shared)
- Bluehost (Shared)
- WP Engine (Managed)
- Kinsta (Managed)
- Rocket.net (Managed)
Choosing the right provider: Consider factors like your website’s traffic expectations, budget, and the features offered by each hosting plan (storage, bandwidth, email addresses, etc.).
- Launch Your WordPress Website (Easy as 1-2-3!)
Most WordPress hosting providers offer a simplified website installation process. Often, it’s just a few clicks to launch a brand-new WordPress website using your chosen domain name.
Each hosting provider has helpful documentation on how to launch your WordPress website and point your domain.
We recommend that you read the documentation or talk to the support team of the hosting provider. - Explore the WordPress Dashboard
Congratulations! You now have a blank canvas (your WordPress website) ready to be customized.
The WordPress dashboard is your central hub for managing all aspects of your website.
Here’s a quick glimpse of key options within the WordPress dashboard:- Posts & Pages: Create and publish blog posts, landing pages, or informative website pages.
- Media Library: Store and manage your website’s images, videos, and other media files.
- Appearance: Change the look and feel of your website with themes and customized menus.
- Plugins: Enhance website functionalities with thousands of free and premium plugins (more on that later!).
- Settings: Configure various website settings like permalinks (website post URLs), as well as general options.
Take some time to explore the WordPress dashboard and familiarize yourself with its functionalities.
There’s a wealth of resources and tutorials available online to help you navigate WordPress quickly.
Now that your WordPress website is running, it’s time to unleash your creativity and personalize its appearance!
Here’s a breakdown of themes, plugins, and page builders to craft a website that perfectly reflects your vision:- Themes: Dress Up Your Website in Style
A WordPress theme functions like a website’s outfit – it defines the overall look and feel.
Thousands of free and premium themes are available, catering to various styles and functionalities.- Free vs. Premium Themes: Free themes offer a good starting point, but premium themes often provide more customization options, advanced features, and dedicated support.
- Choosing the Right Theme: Consider your website’s purpose, target audience, and desired aesthetic. Look for responsive (mobile-friendly) themes, lightweight (for optimal loading speed), and regularly updated for security and compatibility.
- Popular Theme Resources: Browse theme repositories like WordPress.org theme directory or ThemeForest to explore a wide variety of options.


Popular WordPress Themes
Choosing the right theme is important for your WordPress website. Here’s a breakdown of some popular themes with their key strengths:
| Theme Name | Focus & Strengths | Ideal For |
| Astra | ✓ Lightweight & fast loading✓ Highly customizable | ✓ Beginners & experienced users✓ Building high-performance websites |
| Divi | ✓ Drag-and-drop page builder included | ✓ Businesses & individuals seeking design control |
| GeneratePress | ✓ Lightweight & code-optimized for speed✓ Highly customizable with child themes | ✓ Experienced users & developers✓ Creating performance-focused websites |
| Hello Elementor | ✓ Designed for Elementor page builder✓ Lightweight & performance-focused | ✓ Users who rely on Elementor page builder for design |
- Page Builders: Drag-and-Drop Your Dream Website (Optional)
In WordPress, page builders add a visual layer to content creation, allowing you to design layouts with a drag-and-drop interface.
This can be particularly helpful for beginners or those who prefer a more visual approach to website building.
- Popular Page Builders: Elementor, Beaver Builder, Bricks Builder
- Advantages: Easy-to-use interface, ideal for creating complex layouts without coding knowledge, often comes with pre-designed templates to get you started quickly.
- Menu Recreation:
While most drag-and-drop page builders offer their own design and layout functionalities, they typically leverage the built-in WordPress menu system for navigation structure.
This means you can create and manage your website’s menus directly within WordPress, assigning them to designated locations like the header or footer.
This ensures consistency and simplifies menu management across your entire site, regardless of the page builder you choose.
- Plugins: Enhance Functionality Like a Toolbox
Plugins are like tools in your WordPress – they extend your website’s functionalities beyond its core features.
There are plugins for almost anything imaginable, from forms and contact management to SEO optimization and social media integration to security and performance optimization.
- Popular Plugin Categories:
- SEO Plugins: Improve your website’s search engine ranking
- Form Builders: Create easy-to-use contact forms, opt-in forms, etc.
- Security Plugins: Protect your website from vulnerabilities and malware
- Image Optimization: Reduce image file sizes for faster loading speeds
- Analytics Plugins: Track website traffic and visitor behavior
- Caching Plugins: Improve website performance by utilizing different layers of caching.
Popular Essential WordPress Plugins by Type
Here are some of the most popular must-have plugins for WordPress websites.
This is not an exhaustive list, and there are many alternatives to excellent plugins listed below.
| Type | Plugin Name |
| SEO Optimization | Yoast SEO, RankMath, SEO Press |
| Analytics Tracking | MonsterInsights, Microsoft Clarity |
| Form Builder | WPForms, Fluent Forms |
| Security | Wordfence, Sucuri |
| Image Optimization | Smush, EWW Image Optimizer |
| Page Builder | Elementor, Divi, Beaver Builder |
| Backup & Restoration | WPvivid, UpdraftPlus |
| Caching | WP Rocket, LiteSpeed Cache |
| Spam Protection | Akismet Anti-Spam |
| Content Editing (Optional) | Classic Editor |
| Email Marketing | MailChimp, Constant Contact |
Choosing Wisely: Don’t overload your website with too many plugins; it can slow down performance or cause compatibility issues. Install only the plugins you need and keep them updated for optimal security and performance.
B. Prepare Content to Migrate from HubSpot to WordPress
In HubSpot, there are four main components for building a website serving different purposes:
- Website Pages:
- Function: Website pages are the foundational building blocks of your website. They represent core sections with general information about your company, products, services, or contact details.
- Content: Website pages typically include static content like text, images, and videos that comprehensively overview a particular subject or offering.
- Example: “About Us”, “Services”, “Contact Us”, and “Product Features” could all be individual website pages within your HubSpot website.
- Landing Pages:
- Function: Landing pages are focused, targeted web pages designed to convert visitors into leads or customers. They typically promote a specific offer or call to action (CTA).
- Content: Landing pages are usually more concise and action-oriented compared to website pages. They often include compelling headlines, benefit-driven content, forms to capture visitor information, and a clear call to action (e.g., “Download our Ebook”, “Sign Up for a Free Trial”).
- Example: A landing page promoting a new product launch with a signup form for early access or a landing page offering a free consultation in exchange for contact details.
- Blog (Articles or Posts):
- Function: Blog posts are regularly published articles or content pieces designed to attract visitors, establish brand authority, and generate leads.
- Content: Blog posts are typically more dynamic and frequently updated compared to website pages. They can include text, images, videos, and infographics to engage readers and showcase your expertise.
- Example: An article on “The Latest Marketing Trends in 2024,” a blog post offering tips on “How to Use Our Product More Effectively”, or an industry analysis piece relevant to your target audience.
- Forms Submissions:
- Function: These form submissions can be used for various purposes, such as lead generation, customer service inquiries, or feedback collection.
- Content: This data includes contact information, feedback text, survey responses, or other details depending on the form’s purpose.
- Example: A contact form submission might include a visitor’s name, email address, and message.
Here’s a table summarizing the key differences of main HubSpot-based website content:
| Feature | Website Pages | Landing Pages | Blog Posts |
| Purpose | Provide general information | Convert visitors into leads | Attract visitors, establish authority |
| Content Focus | Static, informative | Action-oriented, offer-driven | Dynamic, informative, engaging |
| Updates | Less frequent | Infrequent (may update offer) | Frequent (new posts) |
| Call to Action (CTA) | Optional | Clear and prominent | Optional (may link to other pages) |
By understanding the different functionalities of website pages, landing pages, and blog posts in HubSpot, you can create a well-organized plan to migrate from HubSpot to WordPress.
In this guide, we will migrate:
- Blog Content (data, images, comments, links, etc.)
- Pages Content (data, images, links, etc.)
- All images, including featured images
- URLs of each Page and Blog
- Meta Title & Meta Description
- Publish & Updated Time and Date
- Authors & Forms
- Tags/Categories
Understanding HubSpot and WordPress Terminologies
- WordPress: Keeps things simple with two main content types: Pages for website content and Posts for frequently updated content (like blogs). You can further organize these using Tags (keywords) and Categories (broader themes).
- HubSpot: Offers more options with three content types: Landing Pages for lead capture, Website Pages similar to WordPress pages, and Blogs similar to posts in WordPress. They primarily use Tags for organization, similar to WordPress Tags.
Let’s map them in a tabular format.
| WordPress | HubSpot |
| Pages | Website Pages |
| Pages | Landing Pages |
| Posts | Blog |
| Tags | Tags |
| Categories | Unavailable |
Now that we’ve identified the migration needs, let’s transfer “HubSpot Blog” content to “WordPress Posts” first.
C. Moving Content from HubSpot to WordPress
Migrating your content from HubSpot to WordPress is a straightforward process.
Here, we’ll explore two methods: manual migration and using a plugin.
1. Manual Migration (For Small Blogs)
This method is suitable if you only have a handful of blog posts (think less than ten). It involves copying and pasting the content from HubSpot directly into WordPress.
Here’s how:
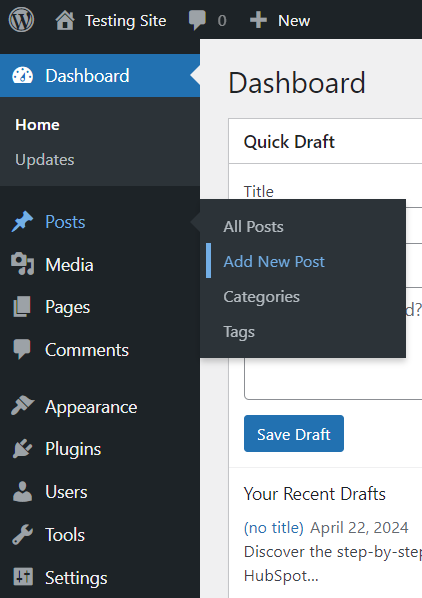
- Navigate to your WordPress dashboard.
- Go to Posts -> Add New Post
This will launch the WordPress editor, where you can paste the content you copied from your HubSpot blog post.

While the default editing experience in WordPress might differ from that of HubSpot, it offers powerful features through its block editor called “Gutenberg”.
Blocks are versatile content elements you can easily add to your posts. These allow you to include elements like Calls to Action (CTAs), forms, tables, and more directly within your content.
To learn more about Gutenberg and its functionalities, check out this handy quick guide.
Once you’ve pasted your HubSpot blog content, take a moment to review the formatting and layout.
You might need to adjust these for a flawless transition from HubSpot blog to WordPress posts.
Images: If your blog posts contain images, you’ll need to download them from HubSpot and upload them to your WordPress media library.
Once uploaded, you can insert them into your WordPress posts’ appropriate locations.
This approach ensures all your content elements are properly imported into your WordPress website.
2. Migrating with a Plugin (For Larger Site & Blogs)
For migrating a large HubSpot website, including pages and blogs with numerous posts (tens or even hundreds), using a plugin is the recommended approach.
Manually migrating a large volume of content will be time-consuming.
The beauty of WordPress lies in its vast plugin repository, built and supported by a global community.
This extends to migration tools, and one popular option is “WP All Import”. It’s a user-friendly plugin that acts as a powerful XML/CSV importer.
Migrate Blogs from HubSpot to WordPress
Firstly, we will migrate the blog from HubSpot to WordPress using the WP All Import WordPress plugin.
- Navigate to your WordPress dashboard
- Go to Plugins -> Add New Plugin

Search for “WP All Import” and install and Activate the plugin.

Important: When installing this version of “WP All Import”, it will download and activate the basic features. These features might have limitations depending on your specific migration needs.
For this example, you will have to use the WP All Import Pro version to successfully migrate from Hubspot to WordPress.
Once the plugin is installed and activated, you’ll see a new menu option called “All Import” appear in the left-hand pane of your WordPress dashboard.
Navigate to “New Import” providing three methods for uploading a file and importing its data.

To migrate your HubSpot blog content, start by exporting all your HubSpot blog posts as a CSV file from your dashboard.
Navigate to Content -> Blog within your HubSpot interface.

This will display a complete list of all your blog posts.
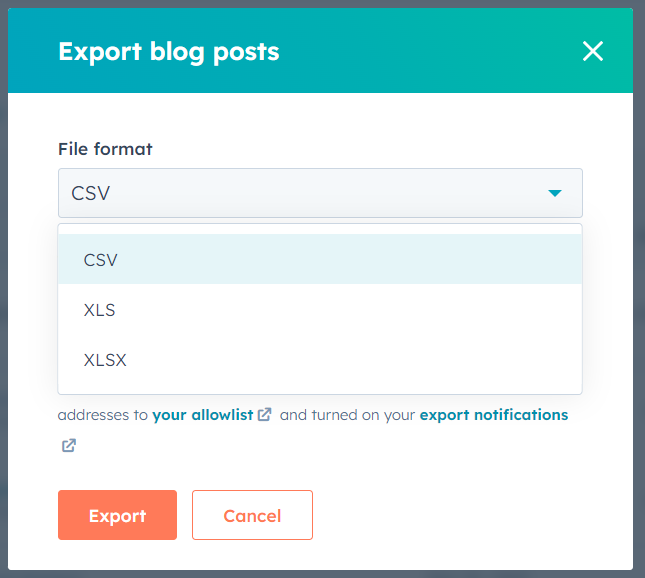
Locate the “Actions” button in the top right corner and select “Export blog posts” from the dropdown menu.

A popup window will appear, allowing you to choose the file format for exporting your blog posts.
Select CSV from the available options and click the Export button to initiate the download.
After processing your export request, HubSpot will send you an email and a notification within your dashboard.
These will let you know when the CSV file containing your blog posts is ready to be downloaded.
Opening and Preparing the CSV File:
Open your downloaded CSV file using a text editor like Notepad, Sublime Text, or a spreadsheet application like Excel or Google Sheets.
Initiate the search-and-replace function (CTRL + H) to remove any domain-specific information from your blog post URLs. Here’s how:
- In “Find” field. You’ll enter the text pattern you want to replace.
- Enter your domain name with a forward slash and “blog/” following it. For example, if your domain is “https://domain.com/” you would enter “https://domain.com/blog/”.
- Leave the “Replace with” field empty. By leaving this field blank, you’re essentially instructing the function to remove the “Find” text from your URLs.
- Once you’re confident, perform the search and replace. Click the “Replace All” button to execute the operation.
Important Note: Be cautious while performing the search and replace. Double-check your domain name and the specific text pattern you’re targeting to avoid accidentally removing unintended parts of your URLs.

Save a copy of the modified CSV file with a new name to avoid overwriting the original data.
Now that you have your blog content prepared in a CSV file and have removed any domain-specific information from your URLs (covered in the previous section), let’s move on to importing it into WordPress using the WP All Import plugin.
Upload the New CSV File to WP All Import
Within your WordPress dashboard, navigate to All Import -> New Import. Here, you’ll likely see two options: “New Items” and “Existing Items.”
Since we’re aiming to create entirely new posts in WordPress from your HubSpot blog content, select the “New Items” option. This will be followed by a dropdown menu where you should choose “Posts”.
By selecting these options, WP All Import will understand that you’re creating new WordPress posts by importing content from your uploaded CSV file.
Click “Continue to Step 2”.
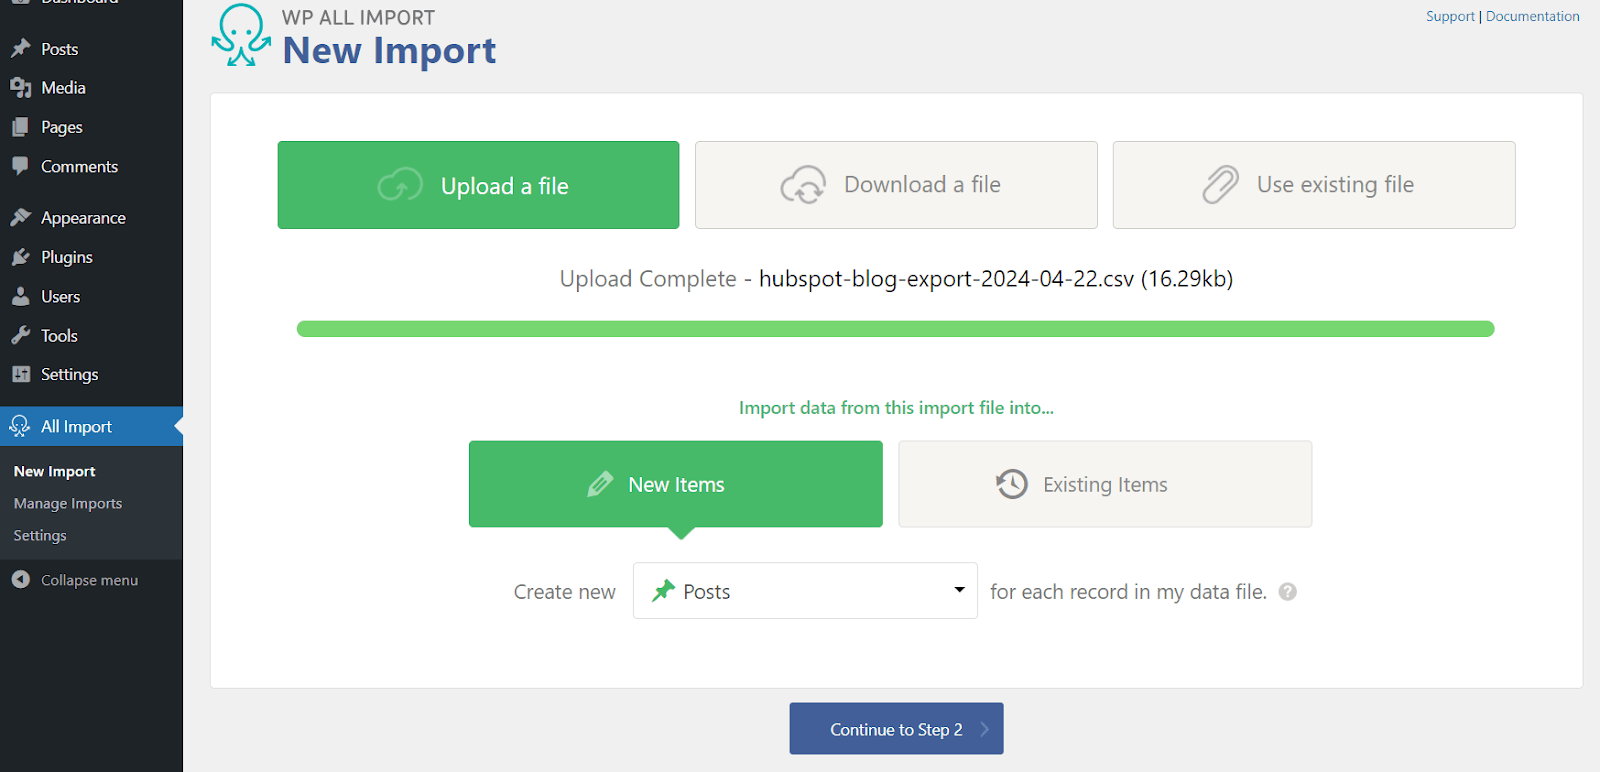
This step is typically a validation stage where WP All Import confirms the number of blog posts it finds within your CSV file.
In our example, it detected four posts. Once you’ve reviewed the post count, click “Continue to Step 3”, which we’ll cover in the next section.

Step 3 is crucial in the import process. Here, you’ll see parameters displayed in blue on the right-hand side.
This represents the data available in your CSV file.
WP All Import needs your help to map this data to the corresponding fields in WordPress posts.
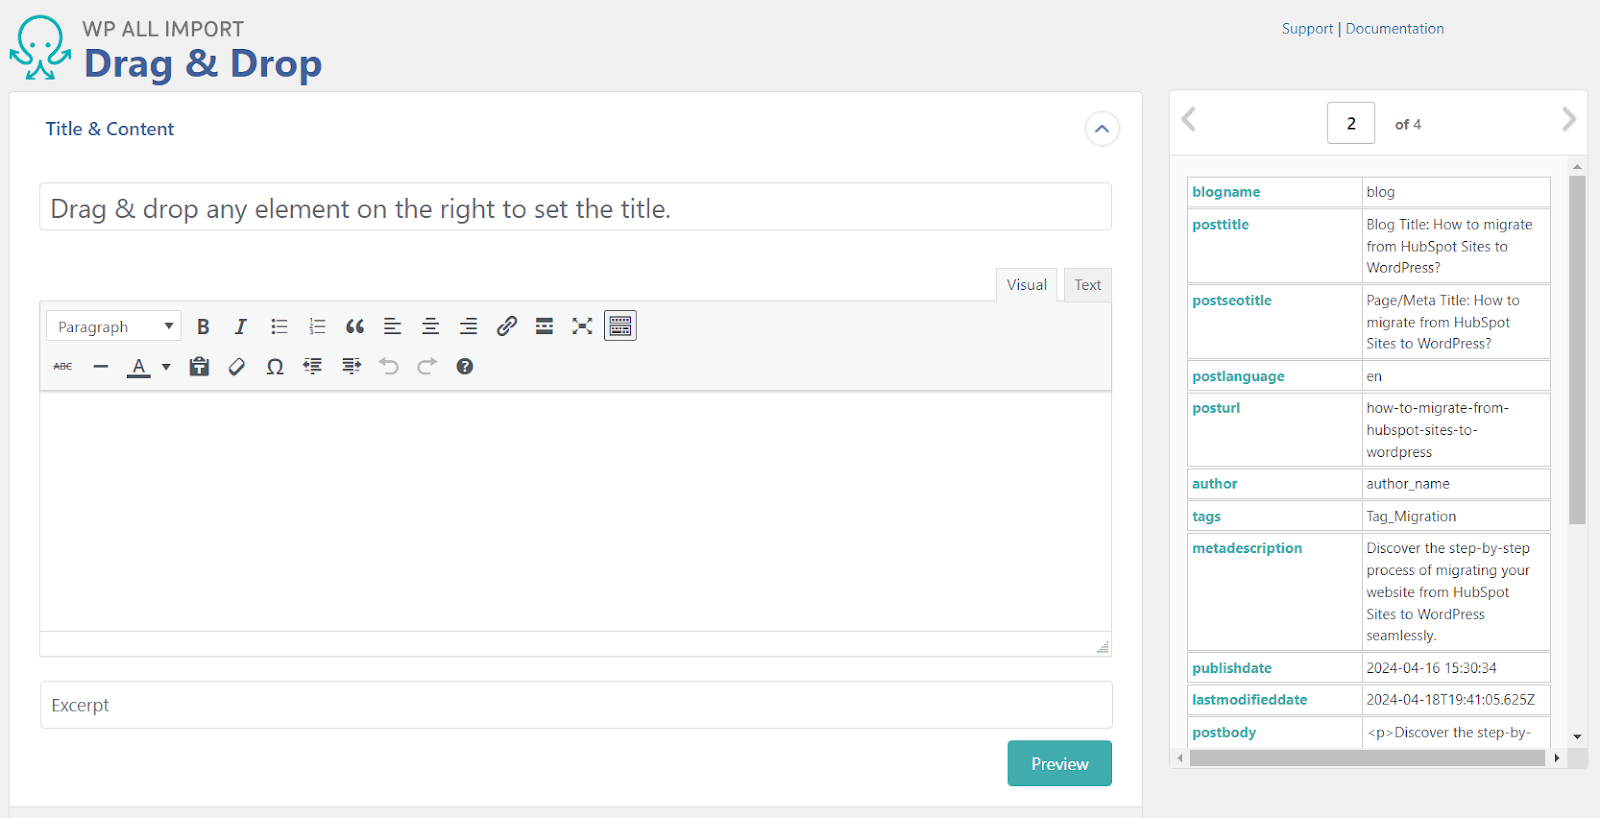
In the “Title & Content” section, let’s begin by using drag-and-drop to move the parameters on the right to their correct places on the left.

HubSpot doesn’t have a dedicated field for excerpts, but you have some flexibility during import with WP All Import.
If your CSV file includes a “metadescription” field containing a short description of your blog posts, you can drag and drop that parameter onto the “Excerpt” field in WP All Import.
Alternatively, if you don’t have a suitable field for excerpts in your CSV or don’t currently use excerpts on your website, you can simply leave the “Excerpt” field blank in WP All Import.
In addition to mapping data points, WP All Import provides a “Preview” button.
Clicking this button allows you to see a sample of how your imported posts will look on your website before finalizing the process.

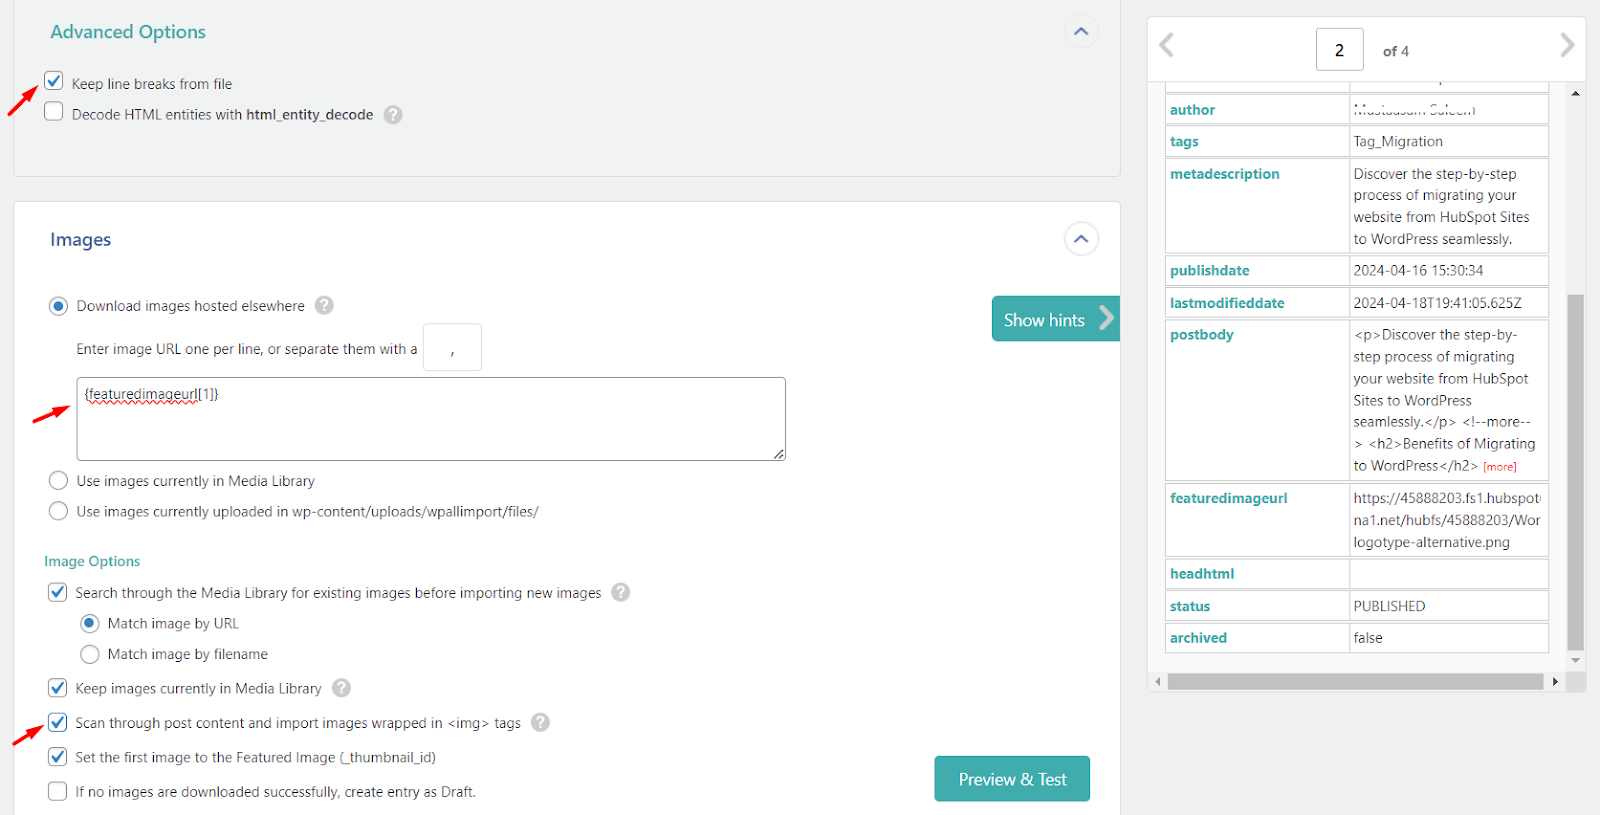
In “Advanced Options”, enable “Keep line breaks from file” to preserve formatting.
In “Images” check “Scan through post content and import images wrapped in <img> tags?” to download embedded images.
This won’t handle featured images, though. For those, drag and drop the featured image parameter to download them with your posts.
The “SEO & Advanced Options” section lets you import SEO details like “postseotitle” (Meta Title) and “metadescription” (Meta Description) from your CSV file.
You can also manage other aspects like image file names during this step.

If your HubSpot CSV includes custom fields beyond the defaults, WP All Import provides a dedicated “Custom Fields” section for mapping those additional data points to your WordPress posts.

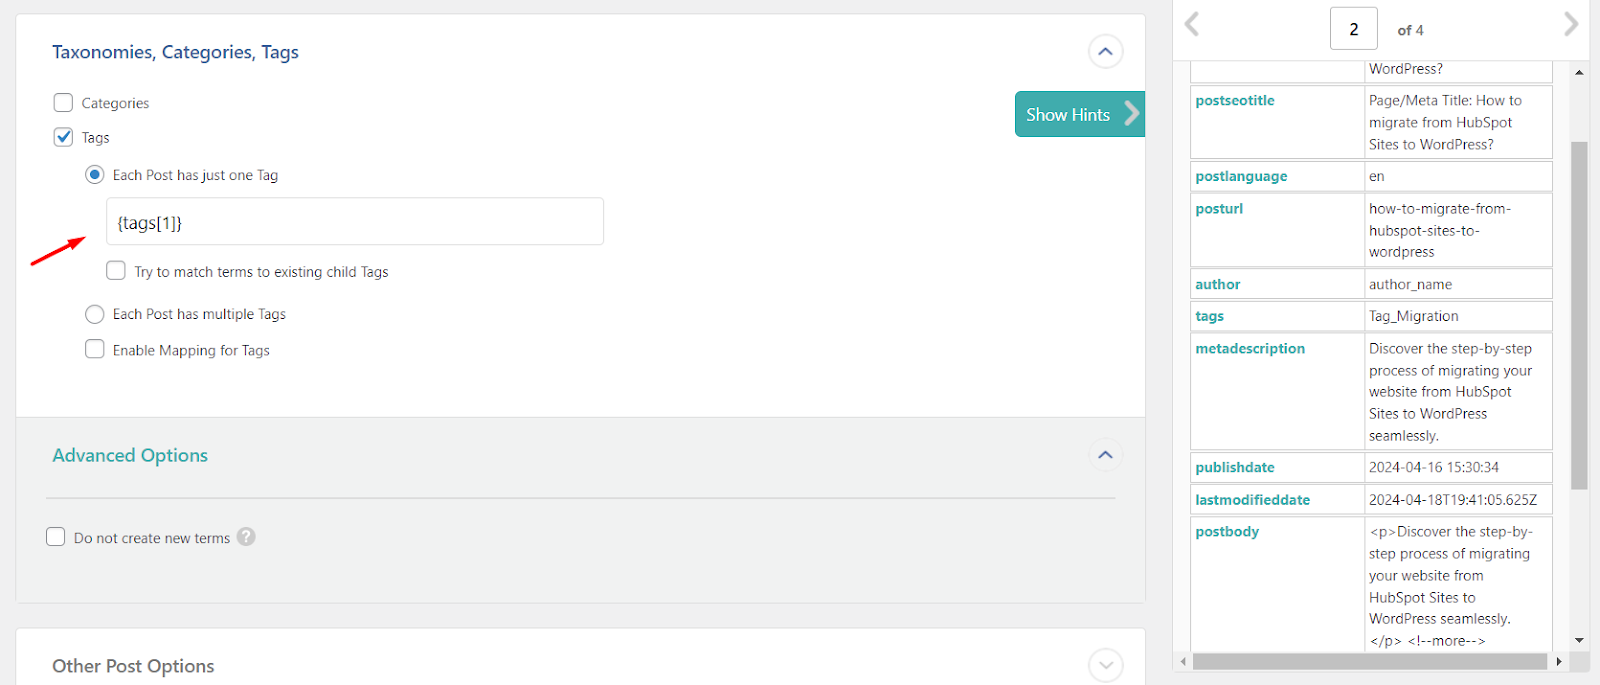
Now we have another important section, “Taxonomies, Categories, Tags”
Before assigning parameters, let’s take a closer look between the three and understand each of them for better mapping.
Organizing your WordPress content for both users and search engines is crucial. This is where taxonomies, categories, and tags come in.
While they all serve the purpose of grouping content, they have distinct roles:
Taxonomies:
- Think of them as classification systems.
- Taxonomies are the overarching frameworks that house categories and tags.
- WordPress comes with two default taxonomies: Categories and Tags. You can also create custom taxonomies for specific needs using a plugin like ACF (e.g., “Product Type” for an e-commerce store).
Categories:
- Think of them as primary buckets for your content.
- Categories are hierarchical, meaning you can create subcategories within parent categories. This allows for a well-organized structure for broader topics.
- Use categories to group similar posts into main themes.
- Example: A blog about food might have categories like “Recipes,” “Restaurant Reviews,” and “Kitchen Tips.” “Recipes” could then have subcategories like “Appetizers,” “Main Courses,” and “Desserts.”
Tags:
- Think of them as descriptive keywords for your content.
- Tags are non-hierarchical, meaning they are independent labels describing specific aspects of your post.
- Use tags to highlight details or secondary themes within a post.
- Example: A blog post categorized under “Recipes” (category) could have tags like “vegetarian,” “pasta,” and “quick meals.”
| Feature | Taxonomies | Categories | Tags |
| Function | Classification system | Primary content grouping | Content description |
| Hierarchy | It can be hierarchical (parent-child) | Hierarchical | Non-hierarchical |
| Structure | Framework for categories and tags (can also be custom) | Organized by broader topics | Descriptive keywords |
| Example | Categories, Tags (default) | “Recipes,” “Restaurant Reviews” | “vegetarian,” “pasta,” “quick meals” |
While HubSpot and WordPress allow content classification, they have slight variations:
- HubSpot: Primarily uses Tags for assigning keywords to content.
- WordPress: Employs a combination of Tags (descriptive keywords) and Categories (broader themes with a hierarchical structure).
Here’s a breakdown of why you might choose one over the other during migration:
- Importing as Tags: This ensures all your posts have some level of organization from the start. You can then create a separate system of parent/child categories for more in-depth organization later.
- Drawbacks of Categories: Importing directly as categories might lead to a large number of potentially redundant categories.
Ultimately, the best approach depends on your specific content structure and how you envision organizing your website.
Important: If you have properly organized Tags in HubSpot, consider using them as categories during import.
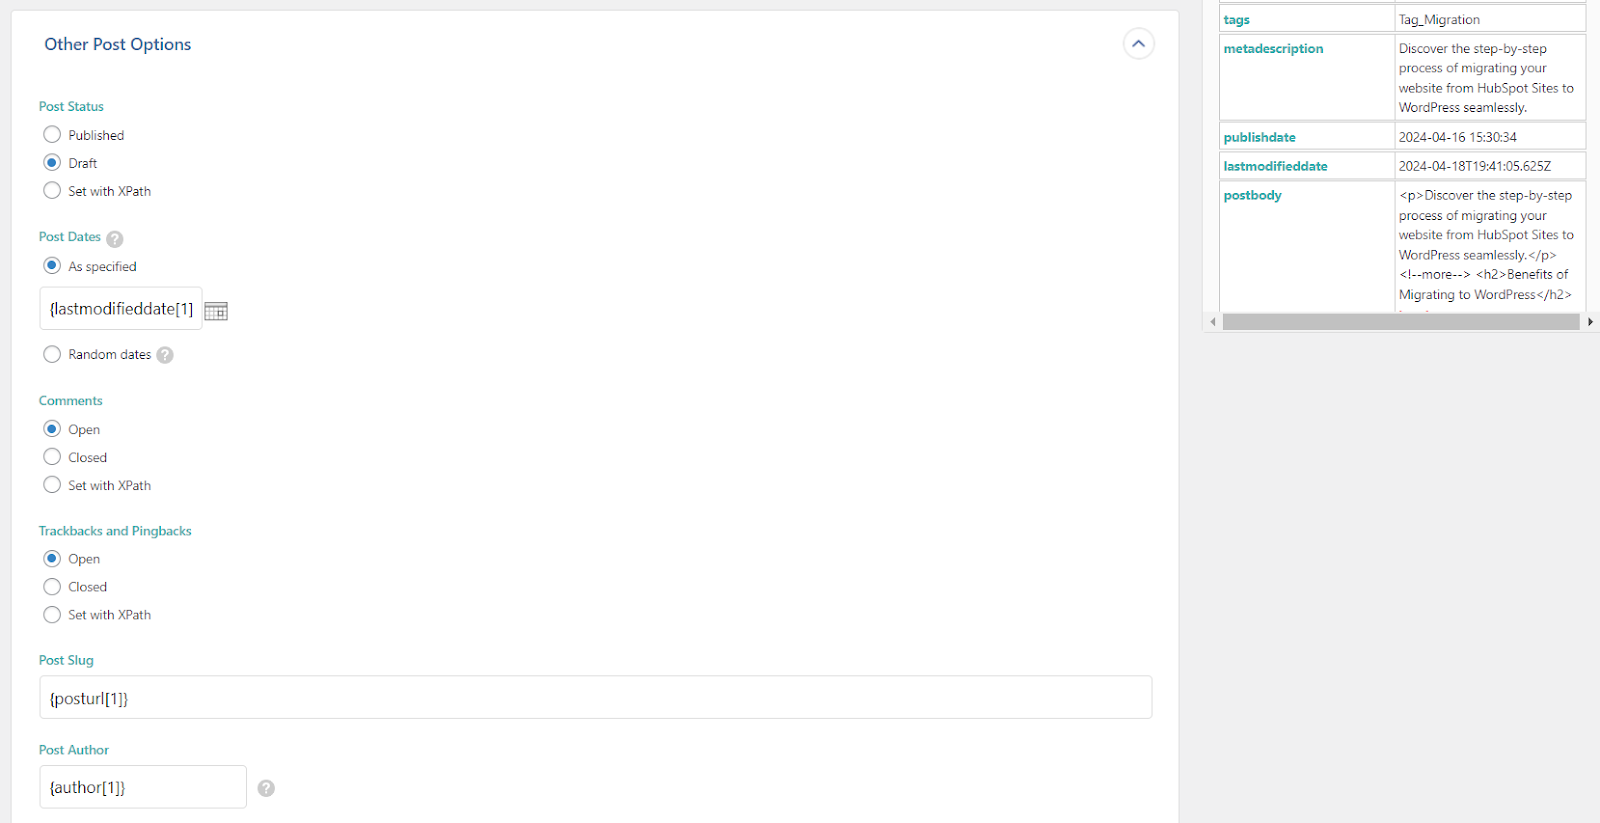
The “Other Post Options” section lets you refine your imported posts. It’s recommended to set them all as “Draft” initially. This allows you to review and edit them before publishing.
You also have flexibility with Post publishing dates – set them to a specific date, randomize them, or import the original dates from your CSV.
For post URLs (slugs), remember you replaced the domain name with “/blog/” in your CSV to avoid using HubSpot’s temporary URLs.
Finally, you can assign authors by dragging and dropping the author parameter, but these users must already exist in your WordPress -> Users section.
Alternatively, leave it blank to attribute all posts to the default “admin” user.
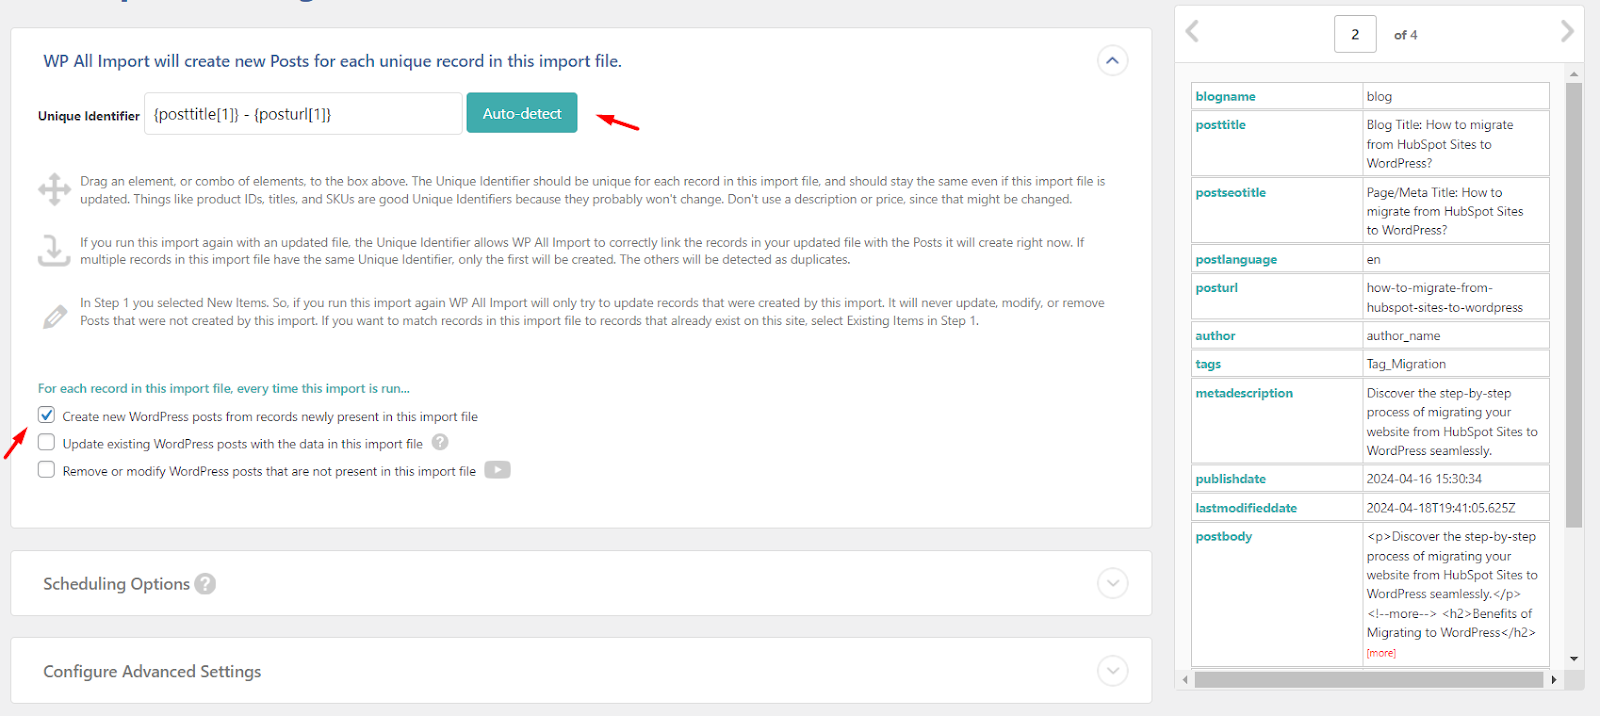
Once everything is set, Continue to Step 4
Hit the Auto Detect button at the top and make sure you check the option “Create new WordPress posts from records newly present in this import file” so the import will create new Posts in WordPress.
This section allow you to configure the import speed.
We recommend keeping the default settings unless you’re familiar with adjusting server settings that could impact the import process.
And… Hit the Continue button to review all settings.

Now that your file is ready to import, hit the “Confirm & Run Import” button.

If the import process ran smoothly, you should see a confirmation message something like below.

Your HubSpot blog posts will now be available in draft mode within WordPress under “Posts”, exactly as you configured during import.

Here’s an example showing that the URL, author, date, tags, draft status, title, and other information were imported successfully.

By default, WordPress uses a structure like:
domain.com/uncategorized/your_post_slug” for Post URLs.
This is not ideal for SEO and readability and doesn’t follow the URL format you had in HubSpot.
- Go to your WordPress dashboard and navigate to Settings -> Permalinks.
- Under “Permalink Settings”, choose the option for “Custom Structure“.
- In the provided field, enter the URL structure that you had in HubSpot. For example, /blog/%postname%/
- Once you’ve entered your correct structure, click the “Save Changes” button.
With these changes implemented, your new blog posts will have URLs that follow the format, making them more informative and potentially improving SEO.

Since the CSV only included one Tag, a corresponding Tag has been created in WordPress.
You can now review your Tags and decide if any cleanup is needed.

The import process not only brought over the two regular images from your HubSpot blog posts but also successfully imported the featured image.
You can now find all three images readily available in your WordPress Media Library.

Upon reviewing Posts in WordPress, you’ll see that the import process not only embedded the images within the post content, but also automatically assigned the correct featured image.

Migrate Blog Comments from HubSpot to WordPress
While HubSpot uses forms to capture blog comments, WordPress has a dedicated commenting system.
This section will discuss how to migrate comments captured through HubSpot forms.
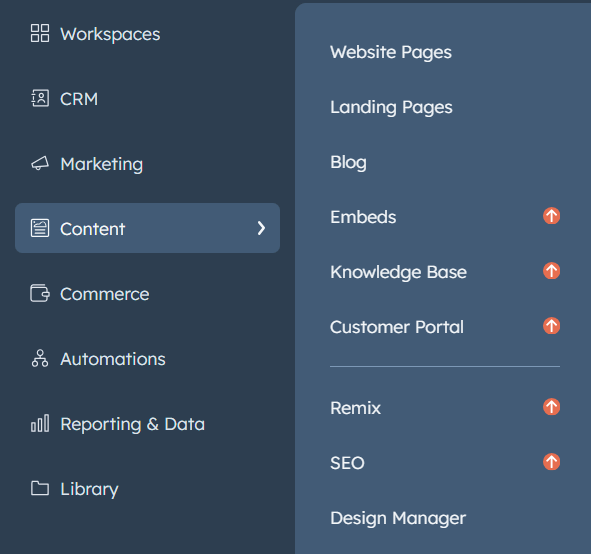
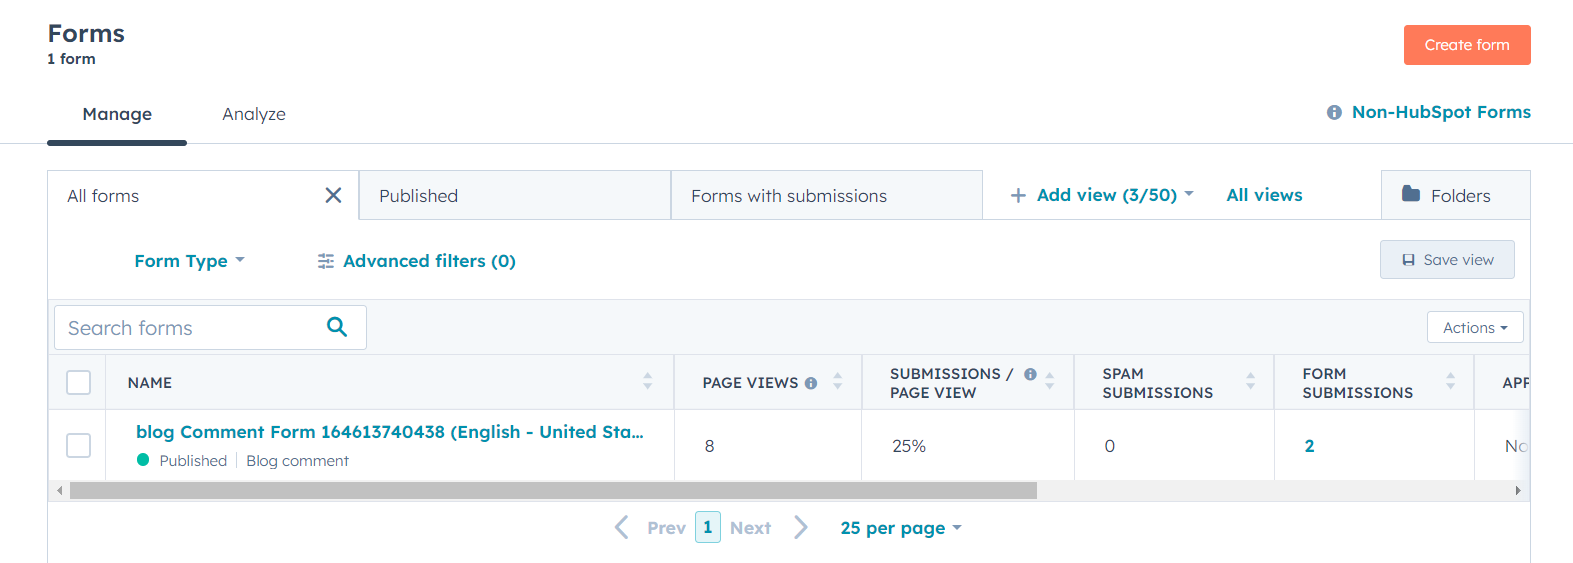
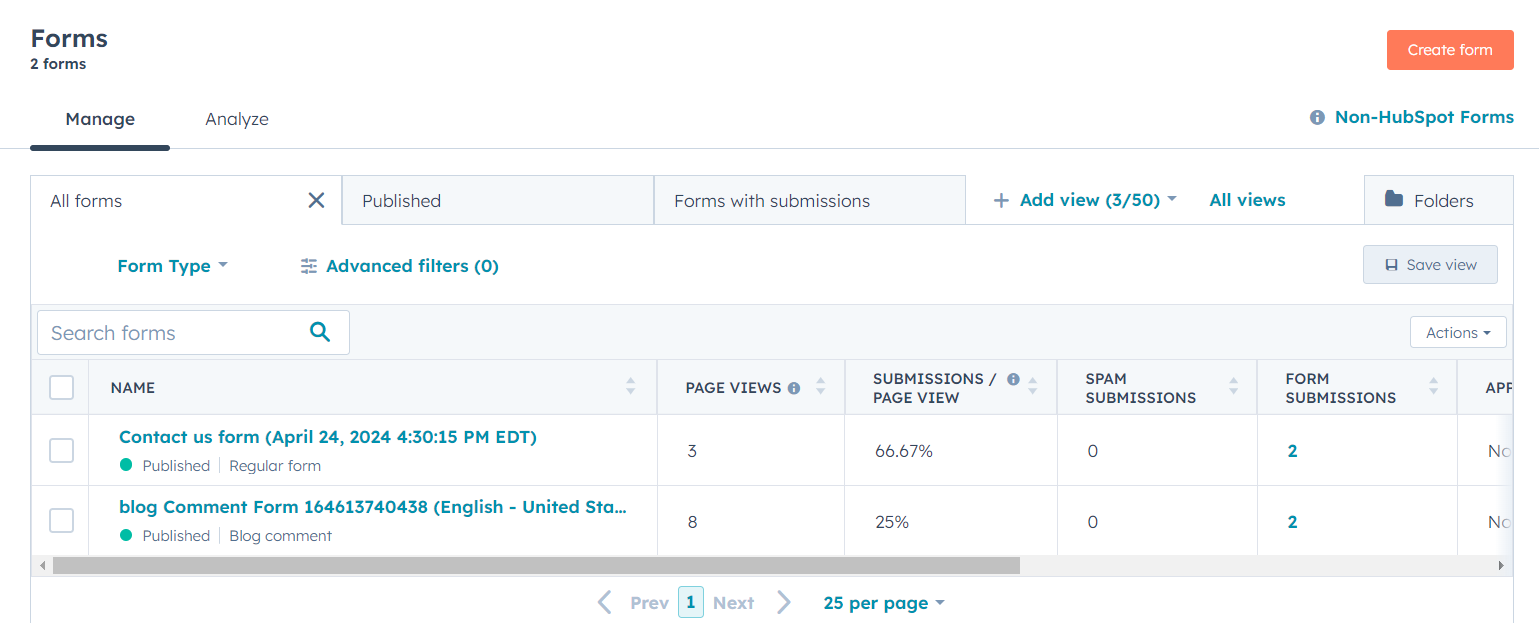
From your HubSpot dashboard, navigate to Marketing -> Forms.

This page shows a list of all your existing forms in HubSpot. The form used to collect blog comments will be included here.
To access the form submissions, click on the number below “Form Submissions”.
Then, click the “Export Submissions” button at the top of the page.

In the export dialog box, choose “CSV” from the “File format” dropdown menu.

After downloading the CSV file, open it for editing. Similar to before, remove any instances of “https://domain.com/blog/” from the URL field to ensure they match the format used for comments.
Once you’ve finished editing the CSV, use it to import comments into WordPress. Here’s how:
- From your WordPress dashboard, navigate to “All Import” and then select “New Import”.
- Click the “Upload a file” button and choose the edited CSV file.
- In the dropdown menu select “Comments”.

After importing the file, take a moment to review the data for any errors or inconsistencies.

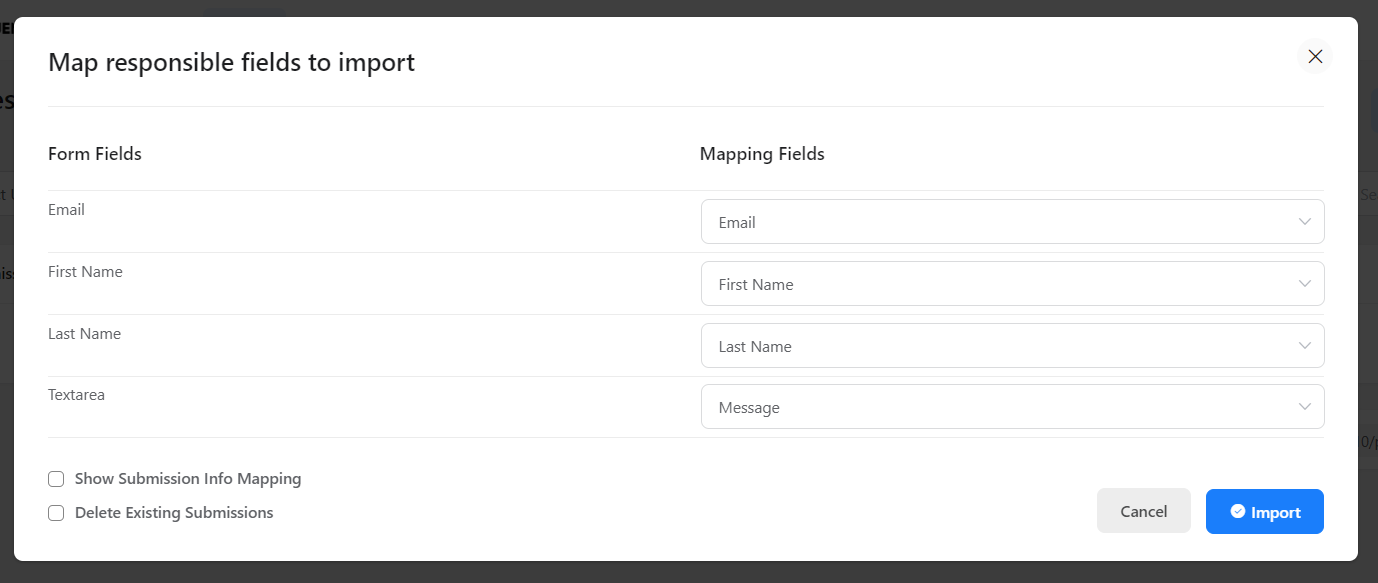
Move on to Step 3, where you’ll map the data points from your CSV file to the relevant parameters in WordPress using drag-and-drop.
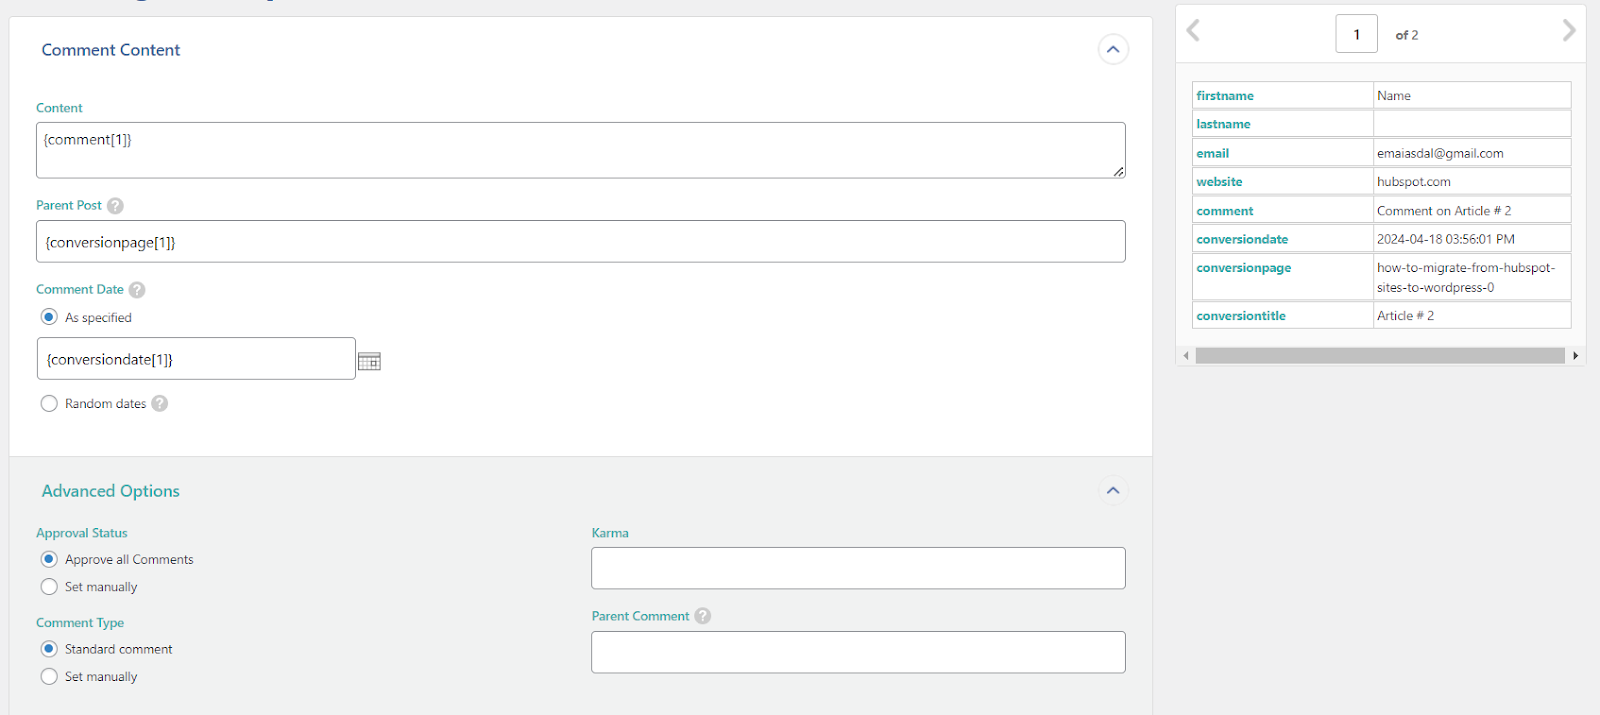
Next, you’ll need to map fields in the “Comment Author” section.

WP All Import needs a unique identifier to track comments during import.
Since each comment itself is likely distinct, we can drag and drop the “Comment” field here to act as that unique identifier.

Hit “Continue” to Run the Importer.

After completing the import, head to the “Comments” section to verify that both comments have been successfully imported.

This is what the imported comments will look like on the corresponding published posts on your site.

Migrating Forms and Popups:
All websites use contact forms and popups to capture leads and grow their audience.
HubSpot offers a form builder, but WordPress provides more flexibility through plugins.
With a vast selection of form plugins available, you can create simple or intricate forms in WordPress to suit your specific needs.
Just choose the plugin that best matches your requirements. Some popular contact form plugins include Gravity Forms, FluentForms, and WS Forms.
To identify the forms currently active on your HubSpot website, navigate to Marketing -> Forms.
In this example, we have two separate forms here: a dedicated Blog Comment form (discussed earlier) and a standard Contact Us form.
Since we’ve already handled the Blog Comments form and its data, let’s now focus on the Contact Us form.
To access the submitted data for this form, click the number below to “Form Submissions”.
You can now export this data by clicking the “Export Submissions” button at the top and downloading it as a CSV file.

With the Contact Us form data downloaded as a CSV file, we can now import it into a WordPress website.
Here’s how to proceed using Fluent Forms, a WordPress form plugin:
Install and Activate Fluent Forms Plugin:
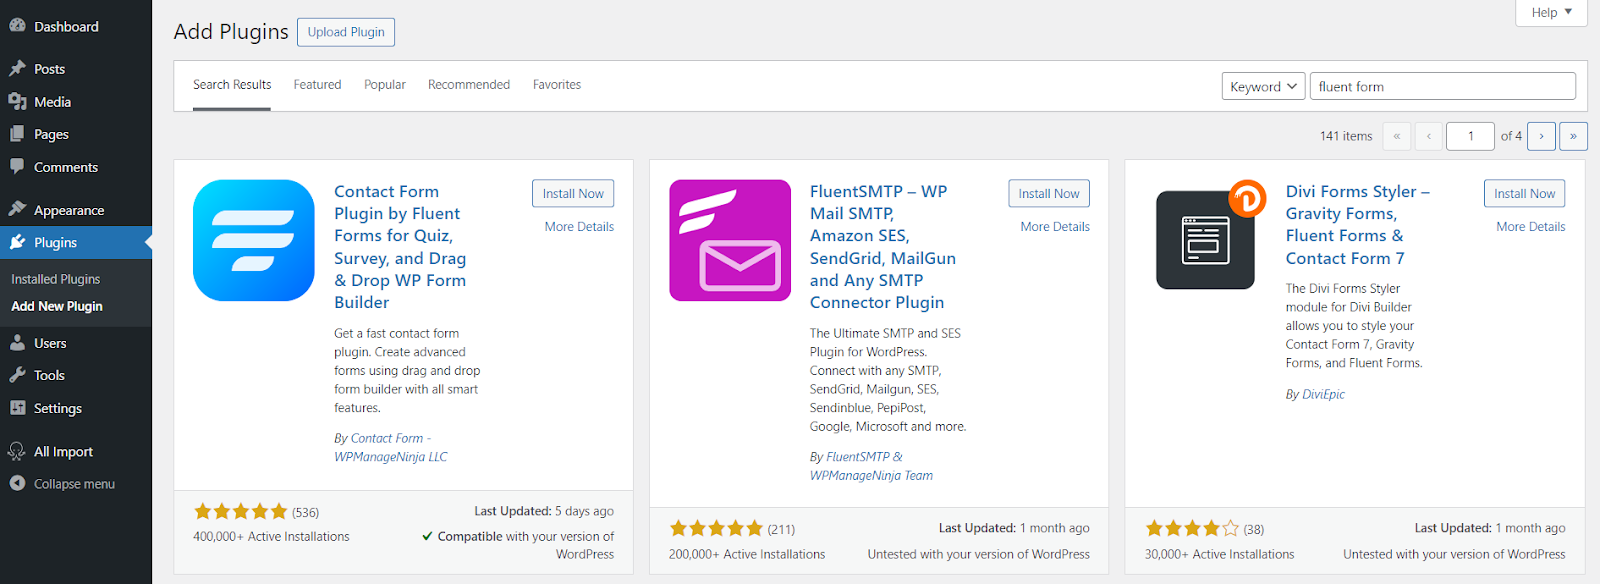
- From your WordPress Dashboard, navigate to Plugins -> Add New.
- Search for “Fluent Forms” and install the plugin.
- Once installed, activate the plugin.
Important: While many WordPress form plugins support importing submissions via CSV, we’ll be using the features of the Fluent Forms Pro which you can get from here.
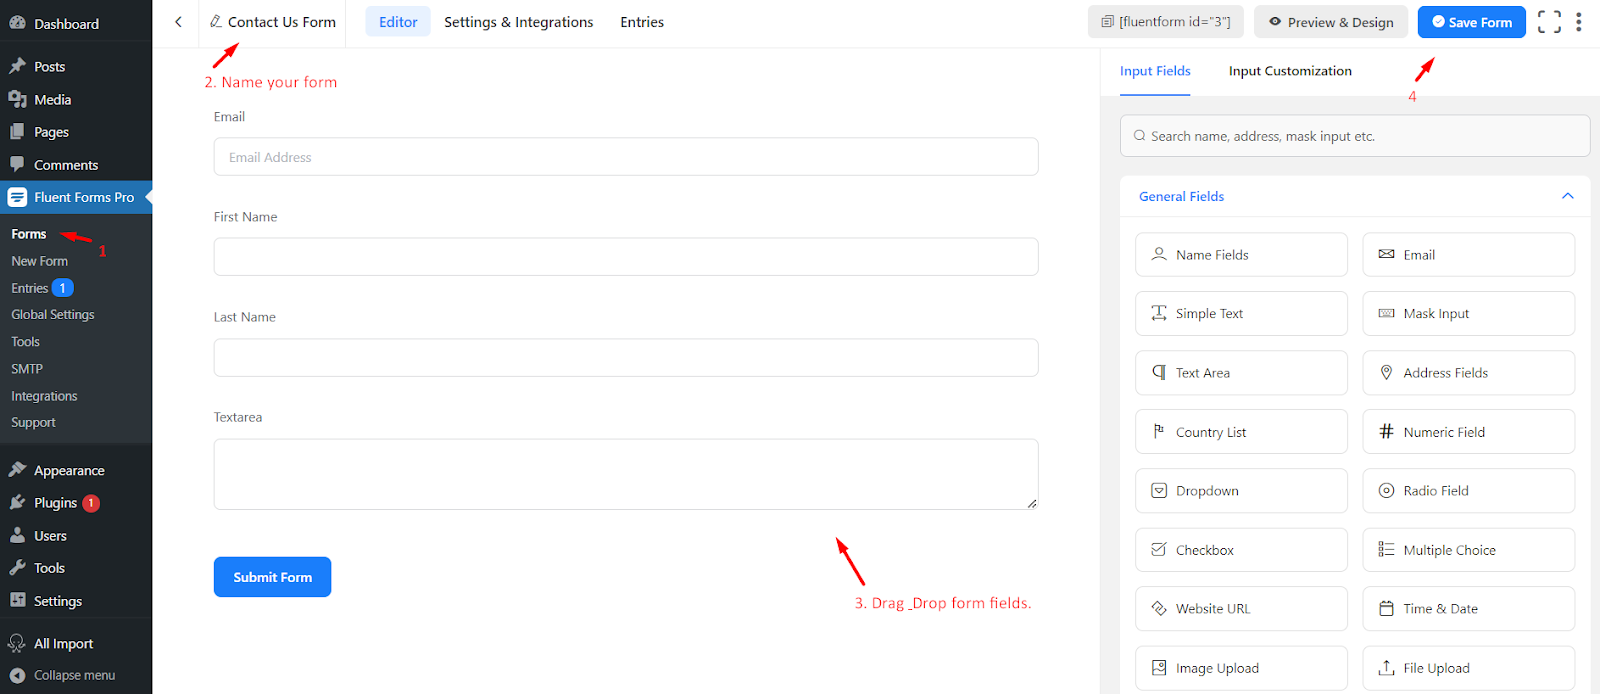
After activating Fluent Forms Pro, head over to Fluent Forms Pro -> Forms.
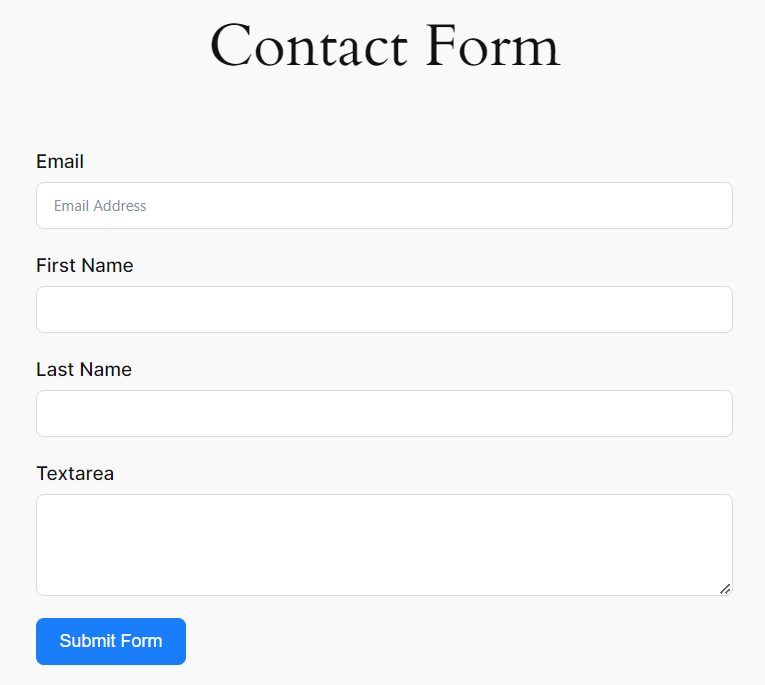
There, you’ll create a new form that replicates the fields from your HubSpot Contact Us form.
Once you’ve finished building the form, be sure to click “Save Form” to preserve your work.
Now that your form is saved, let’s import the form submissions from HubSpot.
Head over to Fluent Forms Pro -> Entries. This section displays all form submissions collected through Fluent Forms.
Since you’ll be importing data to the newly created Contact Us form, make sure it’s selected.
Once you’ve chosen the correct form, click the “Import Entries” button.

In the import window, choose “CSV” as the file format for your HubSpot data.
Click the “Choose File” button and select the CSV file downloaded earlier containing your Contact Us form submissions.
Once the file is uploaded, click the button labeled “Next [Map Columns]” to continue.

After you’ve successfully matched the data points in your CSV file to the corresponding fields in your Fluent Forms Contact Us form, click the “Import” button to finalize the process.
Success! You should now see all your Contact Us form submissions from HubSpot successfully imported into the “Entries” section of Fluent Forms Pro.

Click the “View” button to see the details of your imported Contact Us form submissions.

To embed your newly created Contact Us form on your WordPress website, simply copy and paste the generated form shortcode into any page or post.
This will embed the form, allowing visitors to submit their details.


By following these steps, you’ve successfully imported your existing HubSpot Contact Us form submissions into WordPress using Fluent Forms Pro.
This method can be applied to import submissions from other forms you have in HubSpot as well.
Migrate Website Pages from HubSpot to WordPress
While there’s no magical “migrate with one click” solution, there are a couple of approaches to consider, each with its own advantages and drawbacks:
- Manual Migration (DIY):
- Pros: Gives you the most control over the process and avoids third-party tool dependencies.
- Cons: Time-consuming and requires technical knowledge of WordPress. It involves copying content, recreating layouts, and setting up redirects.
- Professional Services:
Experts handle the entire migration, ensuring a smooth transition. It is ideal for complex websites or if you lack technical expertise.
Pick Your Migration Team:
While the DIY (Do It Yourself) approach offers complete control, it requires significant time and technical expertise.
Benefits of Choosing a Professional Migration Service:
- Expertise & Efficiency: A professional team has the experience and tools to handle complex migrations efficiently, saving you valuable time and resources.
- Minimized Downtime: Professionals prioritize smooth transitions with minimal disruption to your website’s traffic and operations.
- Data Integrity & Security: They ensure your content and data are transferred securely and accurately, minimizing the risk of errors or data loss.
- SEO Preservation: Experts understand the importance of SEO and take steps to maintain your website’s search engine ranking during the migration.
- Peace of Mind: By delegating the migration to a professional team, you can focus on running your business with the confidence of a smooth transition.
For a Seamless Migration, Choose Multidots
This is where Multidots comes in. Our team of WordPress experts specializes in migrating websites from various platforms, including HubSpot.
We handle the entire process, ensuring a smooth transition with minimal downtime. Here’s what sets Multidots apart:
- Expertise & Experience: Our team has extensive experience migrating websites of all sizes and complexities.
- Attention to Detail: We meticulously transfer your content, recreate layouts, and set up redirects to maintain SEO value.
- Communication & Transparency: We keep you informed throughout the process and address any questions you might have.
Ready to Get Started?
Contact Multidots today for a free consultation and quote. We’ll discuss your specific needs and develop a migration plan that fits your budget and timeline.
Planning for Success: Key Considerations
Before diving into the migration process, take some time to plan:
- Website Complexity: The number of pages, forms, and functionalities on your HubSpot website will impact the migration difficulty. A simple website might be manageable with a manual approach, while a complex one might benefit from professional help.
- Technical Skills: Manual migration and plugin usage require technical knowledge of WordPress. Assess your comfort level and consider enlisting help if needed.
- Content Inventory: Create a list of all your Website Pages and Landing Pages in HubSpot. This will help you track progress during the migration.
Building the Foundation in WordPress:
- Theme Selection: Your WordPress theme should align with your desired design and functionalities with a page builder tool for easier layout customization.
- Page Creation: Create new pages in WordPress. You can use the default WordPress editor or leverage the page builder features of your chosen theme.
Content Import and Formatting:
Once you are done creating pages and their layouts in WordPress, you can copy/paste the content from HubSpot into the corresponding new pages in WordPress.
Download Images from HubSpot
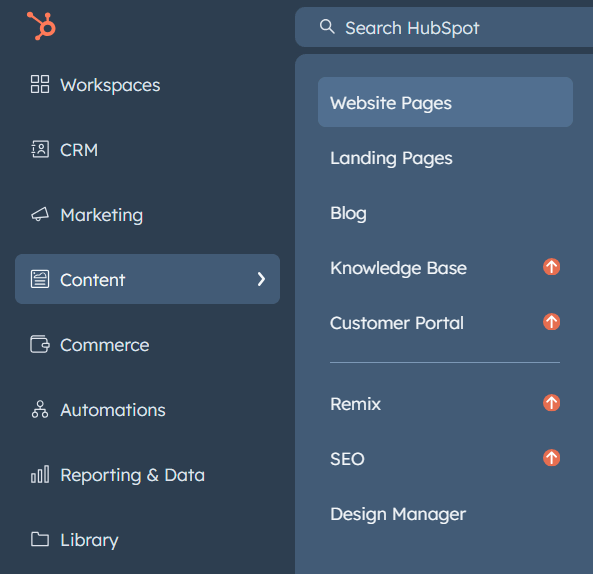
To download images you uploaded in HubSpot, navigate to Marketing -> Marketing Email.

From the top right, click on “Email Tools” then “Files”.
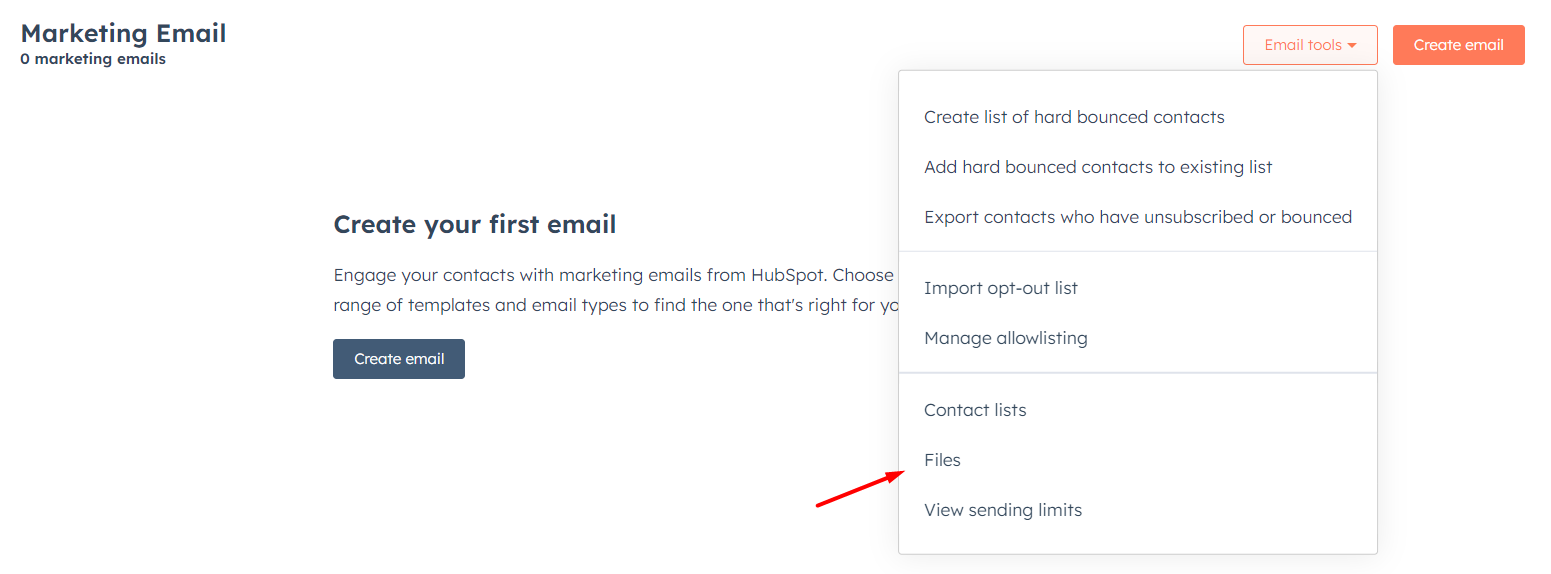
Here, you will see a complete list of all files uploaded into your HubSpot account. Select all files then “Export all files (ZIP)”.
This will download all your files in .zip file.
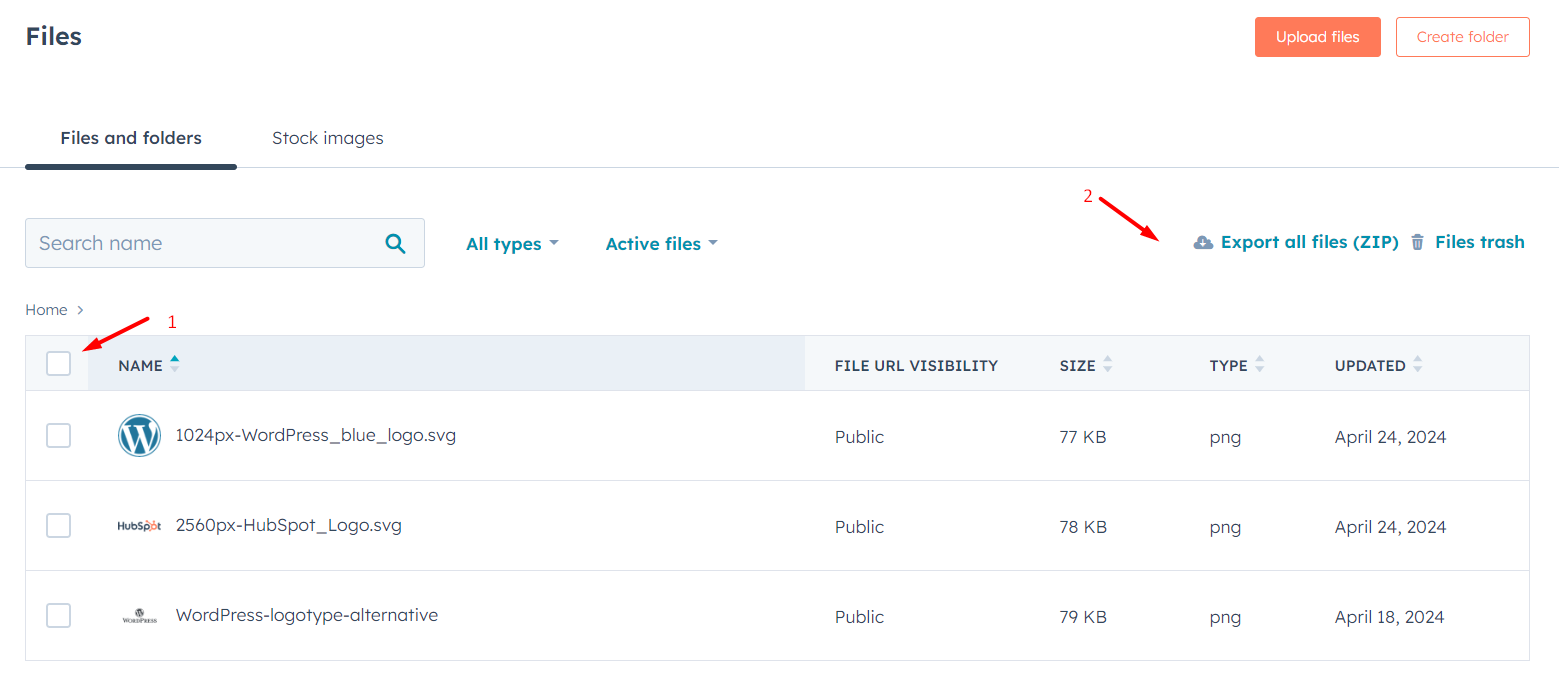
Image Optimization for Faster Loading and Better SEO
For optimal website performance and SEO benefits, it’s crucial to optimize images before uploading them to WordPress.
Large image files will slow down your website’s loading speed, impacting user experience and search engine rankings.
Here’s how you can achieve image optimization:
- Pre-optimize Images: Use free online tools like TinyPNG to compress image file sizes before uploading them to WordPress. This can significantly reduce file size without sacrificing image quality.
- WordPress Optimization Plugins: Popular options include Smush, EWWW Image Optimizer, and Imagify. These plugins can automate the optimization process, saving you time and ensuring consistent optimization for all your uploaded images.
Remember: Balancing image quality with file size is key. Aim for compressed images that maintain a visually appealing look while minimizing their impact on loading speed.
Upload Images to WordPress
To upload these image files, extract the downloaded zip file and navigate to Media -> Add New Media File from your WordPress Dashboard. Drag and Drop all images.
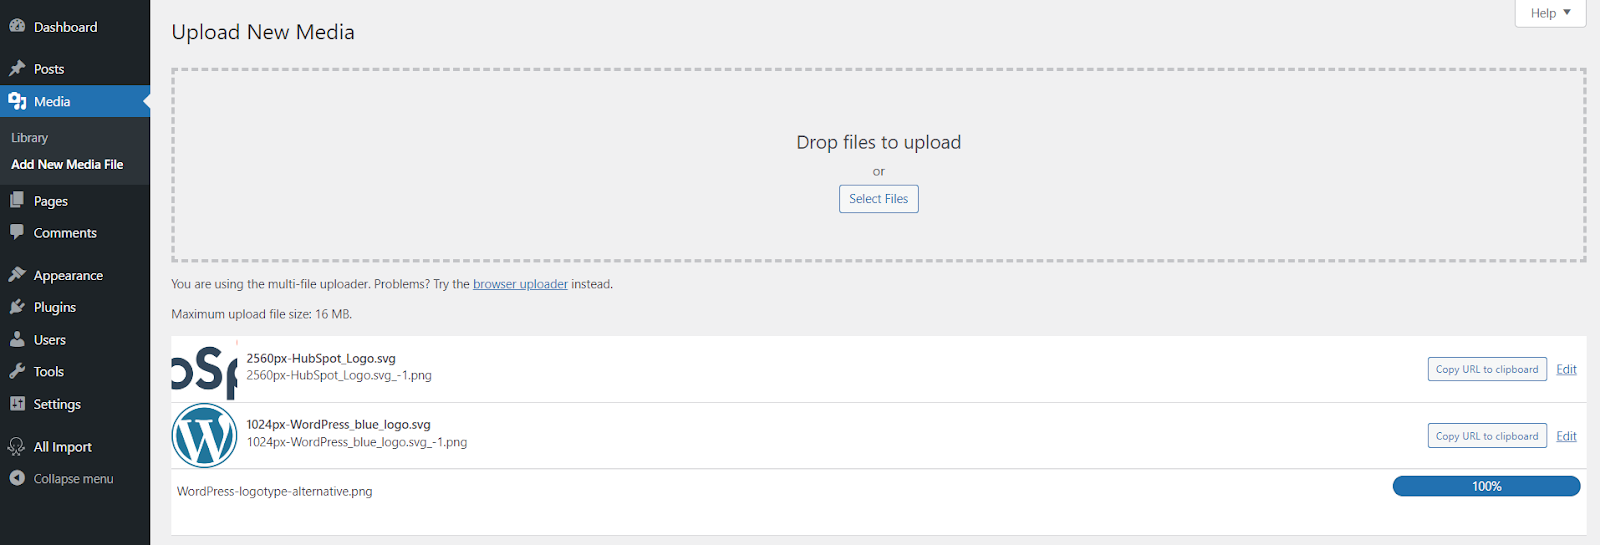
Now you can use these media files into your Pages.
Another Workaround (for Techies)
HubSpot allows you to download Website Pages, Landing Pages, and Blogs as HTML. If you are familiar with HTML and CSS, these HTML pages might be helpful to you.
To export your website content as HTML, navigate to Content -> Website Pages from your HubSpot dashboard.
Here you will see a list of all “Website Pages”. Click the “Actions” button on top-right, and “Export all pages & blog posts (HTML)”.

Once HubSpot done processing your “Export”, it will notify you via email and in the notification center. Download the .zip file that HubSpot generated.

Unzip the downloaded zip file, and navigate to:
\unzipped_folder\com\hubspotpagebuilder\your_domain
Here’s an example for all Website and Landing Pages.

And here’s an example for all Blogs.

Open any of them in your browser you will have similar HubSpot layout design with text and some images.
This page may seem broken since its been served from your local computer instead of HubSpot.
The reason for showing you this is that you get the HTML source code for each of the Website and Landing Pages and Blogs so you can play with the code to adjust it accordingly.
D. Keeping Your HubSpot CRM While Migrating Your Website
While this guide focused on migrating website content, forms, and form submissions from HubSpot to WordPress, you might prefer to keep using HubSpot’s CRM functionalities.
Here are two options that allow you to maintain aspects of HubSpot while migrating your website to WordPress:
Option 1: Focus on Website Migration with Continued HubSpot CRM Use
Suppose you want your website on WordPress but leverage HubSpot for other features like CRM, marketing automation, or email marketing.
In that case, you can migrate your website content and functionality without impacting your HubSpot CRM setup.
Option 2: HubSpot WordPress Plugin for Integration
The HubSpot for WordPress plugin streamlines the connection between your WordPress site and your HubSpot account.
Here’s what it offers:
- Simplified Integration: This plugin simplifies connecting your WordPress site to your HubSpot account.
- Automatic Tracking Code: The plugin automatically adds the necessary HubSpot tracking code to your WordPress pages, ensuring data collection continues for website analytics.
- HubSpot Tools Access: With the plugin installed, you can access some core HubSpot tools directly within your WordPress dashboard, offering a more unified experience.
Important: While the HubSpot WordPress Plugin offers some features, it doesn’t replicate the full functionality of the HubSpot platform. Consider your specific needs and the capabilities of the plugin before implementing it.
E. Migrating User Data (Proceed with Caution)
Migrating user data, such as email addresses, raises legal and security concerns. Here’s what you need to be aware of:
- Data Privacy Regulations: Ensure you comply with relevant data privacy regulations like GDPR (General Data Protection Regulation) before attempting any user data migration. These regulations dictate how user data can be collected, stored, and used.
- User Consent: Obtaining explicit consent from users before migrating their data is crucial. Be transparent about the migrated information and how it will be used on your WordPress site.
Recommendation: Unless absolutely necessary, it’s generally advisable to avoid migrating user data. The potential legal and security risks outweigh the benefits in most scenarios.
Focusing on website content migration and encouraging users to re-register on your WordPress site is often the safer and more compliant approach.
Section III. Redirects and SEO Maintenance
Importance of Redirects:
Redirects play an important role in maintaining a positive user experience and SEO value after migrating your website from HubSpot to WordPress.
This ensures visitors don’t encounter broken links (404 errors) and help search engines understand the new location of your migrated content.
Setting Up Redirects:
Use a plugin such as “Rank Math” to easily set up 301 redirects (permanent redirects) from your old HubSpot URLs to their corresponding new WordPress URLs.
It provides a built-in redirection manager. Access it from your WordPress dashboard and navigate to Rank Math -> Redirections.
You can then add redirects by specifying the old (HubSpot) URL and the new (WordPress) URL.

Ensure all relevant pages, posts, and landing pages have proper redirects in place to avoid broken links.
Sitemap Configuration:
An accurate and updated sitemap is necessary for search engines to effectively crawl and index your website content.
Rank Math provides a built-in sitemap functionality to simplify this process. Here’s how to configure it:
- Navigate to your WordPress dashboard and go to Rank Math -> Sitemap Settings.
- Choose which content types (pages, posts, etc.) you want to include in the sitemap.

Search Engine Submission (Optional): Rank Math allows you to submit your sitemap directly to search engines like Google Search Console and Bing Webmaster Tools. This can help expedite the indexing process for your migrated content.
Broken Link Checking:
After migration, it’s essential to check for any broken links (links that lead to non-existent pages) on your website.
Broken links can frustrate users and negatively impact your SEO. Here’s how to address them:
- Free Online Tools: Utilize free online tools like DeadLinkChecker or Screaming Frog to identify broken links on your website.
- WordPress Plugins: Alternatively, you can use WordPress plugins like Broken Link Checker to scan your website for broken links and fix them directly within your WordPress dashboard.
Important: Maintaining a clean link structure with working links is crucial for a positive user experience and optimal SEO performance.
Maintaining SEO Best Practices:
Beyond redirects, here are some additional SEO considerations after migrating from HubSpot to WordPress:
- Theme and Plugin Settings: Review the SEO settings within your WordPress theme and plugins, particularly those related to titles, meta descriptions, and image alt text.
- Optimize Content: Optimize your website’s pages and posts’ content (titles, meta descriptions, etc.) for relevant keywords to improve search engine ranking.
- Rank Math SEO Tools: Consider using Rank Math for comprehensive SEO guidance and optimization tools. Rank Math offers features like keyword suggestions, on-page SEO analysis, and schema markup creation to help you enhance your website’s SEO performance.
Section IV. Post-Migration Tasks
Your content is now successfully migrated from HubSpot to WordPress!
Here are some essential post-migration tasks to ensure a smooth transition, optimal website performance, and a positive user experience:
A. Thorough Testing of Migrated Content
Take out some time to double-check if everything is fine-tuned.
- Functionality and Display: Meticulously test all migrated content elements, including pages, posts, forms, and menus. Verify that everything functions as intended and displays correctly.
- Images and Links: Double-check that images load properly and that all links work as expected. Broken images or links can hinder user experience.
Responsive Design Check:
In today’s mobile-first world, ensuring your website looks good and functions flawlessly across various devices is important. Here’s how to test responsiveness:
- Browser Developer Tools: Most modern browsers offer built-in developer tools that allow you to simulate different screen sizes and test your website’s responsiveness.
- Mobile Emulators: Alternatively, you can use mobile emulators to preview your website on various mobile devices.
Remember: A responsive website provides an optimal user experience for visitors accessing your site from desktops, tablets, and smartphones.
B. Security Measures
Following a website migration from HubSpot to WordPress, security becomes even more critical. Here’s how to safeguard your WordPress site:
- Update Everything: Regularly update WordPress core, themes, and plugins. Updates often include security patches that address vulnerabilities exploited by hackers. Outdated versions are a common target, so stay current!
- Strong Passwords are Key: Use complex, unique passwords for your WordPress admin account and hosting access. Consider a password manager to generate and store strong passwords securely. Resist the temptation to reuse passwords across different platforms.
- Security Plugins for an Extra Shield: Implement a security plugin like Wordfence, Sucuri, or All in One Security. These plugins offer features like malware scanning, brute-force attack protection, and website firewalls, providing additional layers of defense against security threats.

By following these steps, you can significantly enhance your WordPress website’s security posture after migration.
C. Track Your Success with Analytics
Understanding your website’s performance after migration is important. Here’s how to leverage analytics tools:
- Connect Google Analytics: Integrate Google Analytics with your WordPress site. This will allow you to track website traffic, user behavior, and essential metrics like page views, bounce rate, and engagement time. By analyzing this data, you can gauge the migration’s impact and identify areas for improvement.

- Microsoft Clarity (Optional): Microsoft Clarity offers an alternative approach to website analytics. It focuses on user session recordings and heatmaps, providing visual insights into how users interact with your website. This can be helpful in identifying usability issues and optimizing your website for a better user experience.

Important Note: While Google Analytics provides a comprehensive set of website traffic and performance metrics, Microsoft Clarity offers a more user-centric view through session recordings and heatmaps.
Consider your specific needs and preferences when choosing an analytics tool (or potentially using both!).
D. Mastering Content Management in WordPress
Now that your content is migrated from HubSpot to WordPress, and WordPress offers a user-friendly platform for ongoing content management.
Here are some key areas to explore:
- Exploring the WordPress Dashboard: Dedicate some time to navigating the WordPress dashboard. Familiarize yourself with essential functionalities like content creation (pages, posts), editing existing content, scheduling posts for future publication, and managing website menus.
- Content Organization and SEO: For optimal user experience and search engine optimization (SEO), leverage WordPress’s built-in categories and tags. Categorize your content logically and use relevant tags to help users find what they’re looking for and improve your website’s discoverability in search engines.
- Content Planning and Workflow: Develop a content calendar to plan and schedule future blog posts, website updates, or other content types. This will help you maintain a consistent publishing flow and ensure a steady stream of fresh content for your website visitors. Additionally, establish a clear editorial workflow to streamline content creation, editing, and publishing processes.
By familiarizing yourself with the WordPress interface, organizing your content effectively, and implementing a content calendar and workflow, you can easily manage your website’s content and keep your audience engaged.
E. Optimizing Website Performance
Website speed play vital role for better user experience and SEO.

Here’s how to monitor and optimize your WordPress site’s performance:
- Performance Monitoring Tools: Use website monitoring tools like PageSpeed or GTmetrix to regularly track your website’s loading speed. These tools identify areas for improvement, allowing you to pinpoint bottlenecks and optimize performance.
- Fine-tuning Images: While image optimization might have been part of the migration process, consider using image optimization plugins like Smush or EWWW Image Optimizer to further reduce image file sizes without sacrificing quality. Smaller image files contribute to faster loading times.
- Caching for Efficiency: Explore caching plugins like WP Rocket, LiteSpeed Cache, or W3 Total Cache. Caching stores frequently accessed website elements, like images and scripts, for faster delivery to visitors returning to your site. This can significantly improve website performance, especially for repeat visitors.
By implementing these website performance optimization strategies, you can ensure your WordPress site loads quickly and delivers a smooth user experience.
F. Train Your Team
Migrating to a new platform like WordPress can involve a learning curve for your team.
While many features and functionalities are similar to HubSpot, there will likely be some differences in user interface and content management.
Here’s why training your team on WordPress might be beneficial:
- Increased Efficiency: A well-trained team can quickly adapt to managing your website on WordPress, leading to increased productivity and faster content creation.
- Reduced Errors: Training helps minimize the risk of errors when updating content, setting up workflows, or utilizing plugins.
- Maximized Platform Usage: Your team can learn how to leverage all the features and functionalities of WordPress to their full potential.
Training Options:
- Self-Directed Learning: There are numerous online resources, tutorials, and video courses available to teach your team WordPress basics.
- Professional Training: Consider investing in professional training sessions delivered by WordPress experts. This can provide a more personalized and interactive learning experience.
Remember: Deciding whether or not to train your team depends on your specific needs and budget. If your team is already comfortable with content management systems, self-directed learning might suffice. However, for a smoother transition and maximized platform usage, professional training can be a valuable investment.
With these post-migration tasks, you’ll ensure your WordPress website is secure, optimized for performance, and well-managed for future growth.
Congratulations! You’ve successfully migrated your website from HubSpot to WordPress.
Now you have the freedom and flexibility to customize and manage your website to its full potential.
G. Additional Resources
This section provides helpful resources to further enhance your WordPress website after migration:
- WordPress Codex: The official WordPress documentation, a comprehensive library of resources and tutorials: https://codex.wordpress.org/Main_Page
- WordPress Plugin Directory: Explore thousands of free and premium plugins to extend the functionalities of your WordPress website: https://wordpress.org/plugins/
- WordPress Themes Directory: Discover a vast library of free and premium themes to customize the design and look of your website: https://wordpress.org/themes/
- Rank Math: A popular SEO plugin to optimize your website content for search engines: https://rankmath.com/
- Wordfence: A comprehensive security plugin to protect your website from vulnerabilities: https://www.wordfence.com/
- Google Analytics Academy: Free online courses to learn how to use Google Analytics effectively: https://analytics.google.com/analytics/academy/
Section V. Frequently Asked Questions (FAQs)
This section addresses some common questions you might have after migrating to WordPress:
General Migration Questions:
- Is it difficult to migrate from HubSpot to WordPress?
The difficulty depends on your technical expertise, size of the website and the complexity of your website. Basic migrations can be done with WP All Import plugin, while complex sites like e-commerce stores might require developer assistance.
- Will I lose my website content during migration?
By following the proper procedure mentioned in this guide, you can minimize the risk of data loss. It’s always recommended to back up your HubSpot data before migration.
- How long will the migration process take?
Migration time varies depending on website size and content complexity. Our team will provide you with a proposal that will contain the timeline of the entire project after the initial discovery calls.
- Can I keep using HubSpot features after migrating to WordPress?
You can migrate your website content to WordPress while keeping some HubSpot features like CRM or email marketing by utilizing the HubSpot WordPress plugin. However, this won’t replicate the full functionality of the HubSpot platform.
- Q: How do I keep my WordPress website updated?
A: Regularly update WordPress core, themes, and plugins to ensure security and compatibility. Utilize automatic update features whenever available.
- Q: How do I create backups of my WordPress website?
A: Utilize backup plugins like WPvivid or UpdraftPlus to create regular backups of your website content and database. This ensures you can restore your website in case of any issues.
Content and SEO Questions:
- Will my SEO ranking be affected by migrating to WordPress?
There’s a possibility of temporary ranking fluctuations during migration. However, by implementing proper SEO practices like redirects and sitemap updates, you can minimize the impact and potentially improve your ranking in the long run.
- How can I ensure my website content is transferred correctly to WordPress?
Leveraging a migration expert can help ensure your content is transferred accurately. Double-checking content formatting and functionality after migration is recommended.
- Can I migrate my blog posts from HubSpot to WordPress?
Yes, blog posts are typically included in website content migrations. Plugins and tools can handle transferring blog posts, including text, images, and metadata.
Technical Questions:
- Do I need a developer to migrate my website from HubSpot to WordPress?
Developer assistance might be necessary for complex websites or those requiring specific customizations. However, many basic migrations can be accomplished with plugins and available resources.
- What plugins can I use to migrate from HubSpot to WordPress?
Several plugins can help with migration, such as WP All Import, HubSpot for WordPress by HubSpot, and Blog2Import.
- What happens to my website forms after migrating to WordPress?
Migration tools might not automatically transfer forms. You may need to recreate forms in WordPress using plugins like Fluent Form Pro, Gravity Forms, or Contact Form 7.
By utilizing these resources and addressing any lingering questions, you’ll be well-equipped to manage and optimize your WordPress website for success.
References
Migrate from Hubspot to WordPress today!
Schedule a consultation call to discuss your migration requirements.
(or Contact Us)